One of the best things about technology is that it keeps on changing. On the same lines recently some significant improvements were made for Android by the means of support library.
The new Design Support Library was included in the support repository. This new Android Design Support library features many new UI components like snackbars, floating action buttons and of-course it significantly improves the implementation of Android Tabs. Since Android design support library contains many new UI widgets which were introduced as concepts with material design.
I would write separate tutorials for each one of those. Here lets concentrate on the Android tabs example.
Earlier to make tabs in Android, action bar was used. But now with API 21 onwards it has been deprecated. An alternative way to make tabs with full backward support was to use SlidingTabLayout and SlidingTabStripclasses. But now with Android Design Support Library making swipe tabs has become even more simpler. In this Android Tabs example lets explore the power of new design support library.
Making an Android Tabs by using Android Design Support Library
Tab type navigation mode is a very common design pattern among android apps. But since Android’s 5.0 release, material design came in to picture and allot of changes were made in various APIs. Resulting the deprecation of action bar. Although a new API, Android Toolbar was released to replace it. Due to this change, new APIs for android tabs were also released through the design support library recently. The main class used for displaying tabs through these new APIs is Android TabLayout.
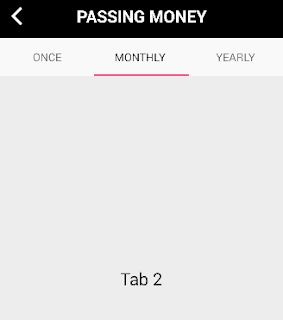
In this Android Tab example we would make a screen with three tabs using these new APIs for tabs with Fragments and a ViewPager which would look like the image below:

To start off please include these libraries in the dependencies section of your build.gradle file:
compile 'com.android.support:appcompat-v7:22.2.0'
compile 'com.android.support:design:22.2.0'
compile 'com.android.support:design:22.2.0'
Now since we will be using Android Toolbar and TabLayout classes to show tabs, lets remove the action bar from layout by using styles:
<resources>
<!-- Base application theme. -->
<style name="AppTheme" parent="Theme.AppCompat.Light.NoActionBar">
<!-- your app branding color for the app bar -->
<item name="colorPrimary">#3F51B5</item>
<!-- darker variant for the status bar and contextual app bars -->
<item name="colorPrimaryDark">#303F9F</item>
<!-- theme UI controls like checkboxes and text fields -->
<item name="colorAccent">#FF4081</item>
</style>
</resources>
Next, to display Android tabs with fragment and ViewPager, lets define three simple fragments and their layouts:
TabLayoutFragmentOne.java
public class TabLayoutFragmentOne extends Fragment {
@Override
public View onCreateView(LayoutInflater inflater, ViewGroup container, Bundle savedInstanceState) {
return inflater.inflate(R.layout.tab_fragment_layout_one, container, false);
}
}
tab_fragment_layout_one.xml
<?xml version="1.0" encoding="utf-8"?>
<RelativeLayout xmlns:android="http://schemas.android.com/apk/res/android"
android:layout_width="match_parent"
android:layout_height="match_parent"
android:orientation="vertical">
<TextView
android:id="@+id/textView"
android:layout_width="wrap_content"
android:layout_height="wrap_content"
android:layout_centerInParent="true"
android:text="Tab 1"
android:textAppearance="?android:attr/textAppearanceLarge"/>
</RelativeLayout>
TabLayoutFragmentTwo.java
public class TabLayoutFragmentTwo extends Fragment {
@Override
public View onCreateView(LayoutInflater inflater, ViewGroup container, Bundle savedInstanceState) {
return inflater.inflate(R.layout.tab_fragment_layout_two, container, false);
}
}
tab_fragment_layout_two.xml
<?xml version="1.0" encoding="utf-8"?>
<RelativeLayout xmlns:android="http://schemas.android.com/apk/res/android"
android:layout_width="match_parent"
android:layout_height="match_parent"
android:orientation="vertical">
<TextView
android:id="@+id/textView"
android:layout_width="wrap_content"
android:layout_height="wrap_content"
android:layout_centerInParent="true"
android:text="Tab 2"
android:textAppearance="?android:attr/textAppearanceLarge"/>
</RelativeLayout>
TabLayoutFragmentThree.java
public class TabLayoutFragmentThree extends Fragment {
@Override
public View onCreateView(LayoutInflater inflater, ViewGroup container, Bundle savedInstanceState) {
return inflater.inflate(R.layout.tab_fragment_layout_three, container, false);
}
}
tab_fragment_layout_three.xml
<?xml version="1.0" encoding="utf-8"?>
<RelativeLayout xmlns:android="http://schemas.android.com/apk/res/android"
android:layout_width="match_parent"
android:layout_height="match_parent"
android:orientation="vertical">
<TextView
android:id="@+id/textView"
android:layout_width="wrap_content"
android:layout_height="wrap_content"
android:layout_centerInParent="true"
android:text="Tab 3"
android:textAppearance="?android:attr/textAppearanceLarge"/>
</RelativeLayout>
Now that we have all the tab fragments defined, lets define a view pager adapter for the swipe tabs feature:
PagerAdapter.java
public class PagerAdapter extends FragmentStatePagerAdapter {
int mNumOfTabs;
public PagerAdapter(FragmentManager fm, int NumOfTabs) {
super(fm);
this.mNumOfTabs = NumOfTabs;
}
@Override
public Fragment getItem(int position) {
switch (position) {
case 0:
TabLayoutFragmentOne tab1 = new TabLayoutFragmentOne();
return tab1;
case 1:
TabLayoutFragmentTwo tab2 = new TabLayoutFragmentTwo();
return tab2;
case 2:
TabLayoutFragmentThree tab3 = new TabLayoutFragmentThree();
return tab3;
default:
return null;
}
}
@Override
public int getCount() {
return mNumOfTabs;
}
}
In the view state pager adapter above, you may see that I have just initialized the fragments as per their location. Next lets define the layout for main activity where all these tabs would be displayed.
Displaying Tabs using Android TabLayout
main_layout.xml
<RelativeLayout
android:id="@+id/main_layout"
xmlns:android="http://schemas.android.com/apk/res/android"
xmlns:app="http://schemas.android.com/apk/res-auto"
xmlns:tools="http://schemas.android.com/tools"
android:layout_width="match_parent"
android:layout_height="match_parent"
tools:context=".MainActivity">
<include layout="@layout/custom_action_bar"/>
<android.support.design.widget.TabLayout
android:id="@+id/tab_layout"
android:layout_width="match_parent"
android:layout_height="wrap_content"
android:layout_below="@+id/toolbar"
android:background="#aaffffff"
android:elevation="6dp"
android:minHeight="?attr/actionBarSize"
android:theme="@style/ThemeOverlay.AppCompat.Dark.ActionBar"/>
<android.support.v4.view.ViewPager
android:id="@+id/pager"
android:layout_width="match_parent"
android:layout_height="fill_parent"
android:layout_below="@id/tab_layout"/>
</RelativeLayout>
Earlier tabs were added to the action bar through code. But as you can see in this Android tabs example layout above we are using Toolbar and the TabLayout separately to display tabs. Also please note a view pager is also added, which would be attached to this TabLayout in the activity below through code.
MainActivity.java
public class MainActivity extends AppCompatActivity {
@Override
protected void onCreate(Bundle savedInstanceState) {
super.onCreate(savedInstanceState);
setContentView(R.layout.activity_main);
Toolbar toolbar = (Toolbar) findViewById(R.id.toolbar);
setSupportActionBar(toolbar);
TabLayout tabLayout = (TabLayout) findViewById(R.id.tab_layout);
tabLayout.addTab(tabLayout.newTab().setText("Once"));
tabLayout.addTab(tabLayout.newTab().setText("Monthly"));
tabLayout.addTab(tabLayout.newTab().setText("Yearly"));
tabLayout.setTabGravity(TabLayout.GRAVITY_FILL);
final ViewPager viewPager = (ViewPager) findViewById(R.id.pager);
final PagerAdapter adapter = new PagerAdapter(getSupportFragmentManager(), tabLayout.getTabCount());
viewPager.setAdapter(adapter);
viewPager.addOnPageChangeListener(new TabLayout.TabLayoutOnPageChangeListener(tabLayout));
tabLayout.setOnTabSelectedListener(new TabLayout.OnTabSelectedListener() {
@Override
public void onTabSelected(TabLayout.Tab tab) {
viewPager.setCurrentItem(tab.getPosition());
}
@Override
public void onTabUnselected(TabLayout.Tab tab) {
}
@Override
public void onTabReselected(TabLayout.Tab tab) {
}
});
}
}
Hope this helps.
No comments:
Post a Comment