I start with question(s)
"What is Floating Notification??"
"How does it work??"
"Why the need of it??"
and many more question can arise in any mind..

What is Floating Notification?
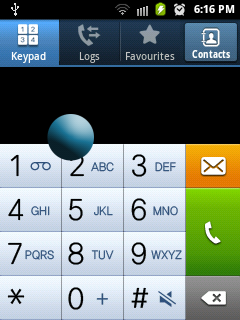
=> Floating Notification is a new and intuitive way to view your notifications. It take notification from application and present it to user as floating circle (icon). Yeah you must be thinking about chat head of Facebook Messenger. That is an example of Floating Notification.
How does it works?
=> Basically what it does is very simple, It hides the notification from notification bar and show those notifications in floating circle which can be dragged anywhere user want on screen.
Why the need of it?
=> There is no specific requirement of it, But it has one very good advantage, that is, users can not only view the notifications but also act on those notification without going off the current app they are using. Because of multi-touch capability, user can even drag across the notification while still keeping finger on the app.
..
Now the main part comes.
Writing Code for floating notification so that we can give this facility in our own custom app.
Create a service of any name and follow the steps...
- First take two variables
private WindowManager windowManager; // WindowManager is the interface that app uses to talk to window manager.
private ImageView floctingicon; // this is the icon touch and to drag on screen.
- Initialize the two variables
windowManager = (WindowManager) getSystemService(WINDOW_SERVICE);
chatHead = new ImageView(this);
chatHead.setImageResource(R.drawable.floating); // set any image/icon for circle.
- Set the parameters for windowManager
final WindowManager.LayoutParams params = new WindowManager.LayoutParams(
WindowManager.LayoutParams.WRAP_CONTENT,
WindowManager.LayoutParams.WRAP_CONTENT,
WindowManager.LayoutParams.TYPE_PHONE,
WindowManager.LayoutParams.FLAG_NOT_FOCUSABLE,
PixelFormat.TRANSLUCENT);
params.gravity = Gravity.TOP | Gravity.LEFT;
params.x = 0;
params.y = 100;
- Add the view to the windowManager
- Fix the movement of icon on touch
try {
floctingicon.setOnTouchListener(new View.OnTouchListener() {
private WindowManager.LayoutParams paramsF = params;
private int initialX;
private int initialY;
private float initialTouchX;
private float initialTouchY;
@Override
public boolean onTouch(View v, MotionEvent event) {
switch (event.getAction()) {
case MotionEvent.ACTION_DOWN:
// Get current time in nano seconds.
initialX = paramsF.x;
initialY = paramsF.y;
initialTouchX = event.getRawX();
initialTouchY = event.getRawY();
break;
case MotionEvent.ACTION_UP:
break;
case MotionEvent.ACTION_MOVE:
paramsF.x = initialX
+ (int) (event.getRawX() - initialTouchX);
paramsF.y = initialY
+ (int) (event.getRawY() - initialTouchY);
windowManager.updateViewLayout(floctingicon, paramsF);
break;
}
return false;
}
});
} catch (Exception e) {
// TODO: handle exception
}
- Put code to kill service onDestroy method
if (floctingicon!= null) {
windowManager.removeView(floctingicon);
this.stopSelf();
}
Service is completed here.. Now create an Activity and two buttons on it.
XML file of activity should be like this.
<RelativeLayout xmlns:android="http://schemas.android.com/apk/res/android"
xmlns:tools="http://schemas.android.com/tools"
android:layout_width="match_parent"
android:layout_height="match_parent"
tools:context=".MainActivity" >
<Button
android:id="@+id/button1"
android:layout_width="wrap_content"
android:layout_height="wrap_content"
android:layout_alignParentLeft="true"
android:layout_alignParentRight="true"
android:layout_alignParentTop="true"
android:layout_marginTop="100dp"
android:text="@string/start" />
<Button
android:id="@+id/button2"
android:layout_width="wrap_content"
android:layout_height="wrap_content"
android:layout_alignLeft="@+id/button1"
android:layout_alignRight="@+id/button1"
android:layout_below="@+id/button1"
android:layout_marginTop="10dp"
android:text="@string/stop" />
</RelativeLayout>
Now Write code on click of button to start and to stop service.
It should look like this.
public class MainActivity extends Activity {
@Override
protected void onCreate(Bundle savedInstanceState) {
super.onCreate(savedInstanceState);
setContentView(R.layout.main);
Button launch = (Button) findViewById(R.id.button1);
launch.setOnClickListener(new OnClickListener() {
@Override
public void onClick(View v) {
startService(new Intent(MainActivity.this, FlyBall.class));
}
});
Button stop = (Button) findViewById(R.id.button2);
stop.setOnClickListener(new OnClickListener() {
@Override
public void onClick(View v) {
stopService(new Intent(MainActivity.this, FlyBall.class));
finish();
}
});
}
And here you are almost done.
Your full Service should look like this
public class FlyBall extends Service {
private WindowManager windowManager;
private ImageView floctingicon;
@Override
public IBinder onBind(Intent intent) {
// TODO Auto-generated method stub
return null;
}
@Override
public void onCreate() {
super.onCreate();
windowManager = (WindowManager) getSystemService(WINDOW_SERVICE);
floctingicon= new ImageView(this);
chatHead.setImageResource(R.drawable.floating);
final WindowManager.LayoutParams params = new WindowManager.LayoutParams(
WindowManager.LayoutParams.WRAP_CONTENT,
WindowManager.LayoutParams.WRAP_CONTENT,
WindowManager.LayoutParams.TYPE_PHONE,
WindowManager.LayoutParams.FLAG_NOT_FOCUSABLE,
PixelFormat.TRANSLUCENT);
params.gravity = Gravity.TOP | Gravity.LEFT;
params.x = 0;
params.y = 100;
windowManager.addView(floctingicon, params);
try {
chatHead.setOnTouchListener(new View.OnTouchListener() {
private WindowManager.LayoutParams paramsF = params;
private int initialX;
private int initialY;
private float initialTouchX;
private float initialTouchY;
@Override
public boolean onTouch(View v, MotionEvent event) {
switch (event.getAction()) {
case MotionEvent.ACTION_DOWN:
// Get current time in nano seconds.
initialX = paramsF.x;
initialY = paramsF.y;
initialTouchX = event.getRawX();
initialTouchY = event.getRawY();
break;
case MotionEvent.ACTION_UP:
break;
case MotionEvent.ACTION_MOVE:
paramsF.x = initialX
+ (int) (event.getRawX() - initialTouchX);
paramsF.y = initialY
+ (int) (event.getRawY() - initialTouchY);
windowManager.updateViewLayout(floctingicon, paramsF);
break;
}
return false;
}
});
} catch (Exception e) {
// TODO: handle exception
}
}
@Override
public void onDestroy() {
super.onDestroy();
if (floctingicon!= null) {
windowManager.removeView(floctingicon);
this.stopSelf();
}
}
}
Now Its Done.
Thank you for having this much patience.